The integration of the Model Context Protocol (MCP) servers within Open WebUI significantly extends its functionality, by allowing access to external capabilities. Open WebUI both leverage native support for MCP server offering the HTTP streamable format, and usage of the mcpo (MCP-to-OpenAPI proxy server) for broader compatibility.
This article explains how to configure MPCO to leverage all kinds of MCP servers: local via sdio, or remote via SSE (Server-Sent Events), or Streamable HTTP. While this other article explains native support of HTTP streamable MCP servers in Open WebUI (added at the end of Sept 2025).
What is MCP?
MCP is an open standard that functions as a universal communication bridge, connecting LLMs to external tools and data sources. This protocol enables AI assistants to access real-time information and perform tasks on a variety of different areas.
MCP servers communicate with clients (the LLMs) using three primary channels: stdio (standard input/output), SSE (Server-Sent Events), or Streamable HTTP.
Because of the core architecture of Open WebUI, which is a web-based, multi-tenant environment, not a local desktop process, and because long-lived stdio or SSE connections are difficult to maintain securely across users and sessions, Open WebUI team decided to create mcpo (MCP-to-OpenAPI proxy server) – an open-source proxy that translates stdio, SSE-based or streamable HTTP MCP servers into OpenAPI-compatible endpoints.
In addition, mcpo automatically discovers MCP tools dynamically, generates REST endpoints, and creates interactive, human-readable OpenAPI documentation accessible at http://localhost:8000/docs.
Configure a mcpo server
mcpo can run MCP servers written as npm packages via npx, python packages via uvx, and can also wrap calls to SSE or Streamable HTTP MCP servers.
When launched from the command line, it’s possible to specify both an MCP server mcpo will run, or a configuration file which defines the MCP servers it will manage, their exposed names, etc. The project page has a lot examples on how to configure the different servers.
This article will use docker compose to launch mcpo, and a configuration file to define the MCP servers to expose. A simple docker-compose.yaml file follows:
services:
  mcpo:
    container_name: mcpo
    image: ghcr.io/open-webui/mcpo:main
    restart: unless-stopped
    volumes:
      # Map your local config directory to /app/config inside MCPO container
      - /Volumes/Data/development/open-webui/volumes/mcpo:/app/config
    ports:
      - 8000:8000
    # Command to launch MCPO using the mounted config file, with hot-reload enabled
    command: --config /app/config/config.json --hot-reload
In this example, the configuration file is created under /Volumes/Data/development/open-webui/volumes/mcpo/config.json on the host running Docker, which maps to /app/config/config.json in the command line passed to mcpo.
Four MCP servers are exposed via mcpo using the following config file:
{
  "mcpServers": {
    "time": {
      "command": "uvx",
      "args": ["mcp-server-time", "--local-timezone=America/New_York"]
    },
    "youtube-transcript": {
      "command": "uvx",
      "args": [
        "--from",
        "git+https://github.com/jkawamoto/mcp-youtube-transcript",
        "mcp-youtube-transcript"
      ]
    },
    "open-meteo": {
      "command": "npx",
      "args": ["open-meteo-mcp-server"]
    }
    "coingecko": {
      "type": "streamable-http",
      "url": "https://mcp.api.coingecko.com/mcp"
  }
}timeis a MCP server offering time information, created using a python packageyoutube-transcriptis another python MCP server to transcribe YouTube videos, created directly from its github repo.open-meteois a nodejs MCP server offering weather forecasts via Open-Meteo APIs.coingeckois the same CoinGecko streamable HTTP MCP server used in the other article about MCP and Open WebUI, this time exposed via mcpo.- When possible, I prefer to use native support to MCP servers directly, to avoid wrapping calls into another service.
Easy to spot, the configurations to add to the config.json file uses the same format of Gemini CLI, Claude, Visual Studio, or other MCP server clients.
Once changed the configuration, it’s possible to check if they’re correct looking at the mcpo container logs, using docker logs -f mcpo command. For example:
2025-10-26 15:12:07,498 - INFO - Config file modified: /app/config/config.json
2025-10-26 15:12:08,011 - INFO - Adding servers: ['coingecko_mcp_streamable_http']
2025-10-26 15:12:10,158 - INFO - HTTP Request: POST https://mcp.api.coingecko.com/mcp "HTTP/1.1 200 OK"
2025-10-26 15:12:10,159 - INFO - Received session ID: 7a3c7019bf4ec1aaa7b213d017cd968ca1c609ee6bb5612622a0d4ad41b8579d
2025-10-26 15:12:10,162 - INFO - Negotiated protocol version: 2025-06-18
2025-10-26 15:12:10,736 - INFO - HTTP Request: POST https://mcp.api.coingecko.com/mcp "HTTP/1.1 202 Accepted"
2025-10-26 15:12:10,806 - INFO - HTTP Request: GET https://mcp.api.coingecko.com/mcp "HTTP/1.1 404 Not Found"
2025-10-26 15:12:11,204 - INFO - HTTP Request: POST https://mcp.api.coingecko.com/mcp "HTTP/1.1 200 OK"
2025-10-26 15:12:12,038 - INFO - Successfully connected to new server: 'coingecko'
2025-10-26 15:12:12,038 - INFO - Config reload completed successfully
Otherwise, an ERROR log instance will be present.
The list of the MCP servers exposed, and their docs (what the LLM sees) can be browsed at http://localhost:8000/docs.
Connect to mcpo in Open WebUI
There are two ways to connect to mcpo in Open WebUI: via a User Tool Server in the User Settings, and via a Global Tool Server in the Admin Settings.
- User Tool Servers utilize the client-side (your browser) to make the connection.
- Ideal for accessing highly specific, local, or private development endpoints on your machine, as the resource exposure is isolated only to your session.
- It would be possible to launch an mcpo server instance on the local machine and connect to it, while having Open WebUI running on another, remote, server, which was not configured to use the MCP, and for which the user has no admin privileges.
- For example, a filesystem MCP can access files accessible only from the local machine where mcpo runs, while the Open WebUI server doesn’t have access to them.
- Global Tool Servers utilize the server-side (Open WebUI’s backend) to make the connection.
- This means the tool must be reachable from the server environment, typically using internal Docker network names or the host alias (
host.docker.internal). It’s also possible to access to a mcpo running on another server / remotely, and reachable by the Open WebUI host machines. - For example, a fileserver MCP can access files present on the server, and not accessible to the user.
- It would be possible to configure authentication credential shared among all the Open WebUI users, like the same Bearer token or sessions.
- Once configured on the Open WebUI server, the MCP could be made available to all the users.
- This means the tool must be reachable from the server environment, typically using internal Docker network names or the host alias (
Of course, distinctions from these two options fade away if both Open WebUI and mcpo are launched on the same local machine, used to connect to Open WebUI. But it’s important to keep this distinction in mind.
Each server exposed by mcpo has to be configured separately.
For configuring Global Tool Servers, using the time server as example:
- Navigate to Admin Panel -> Settings -> External Tools.
- Click “+“ (Add Connection).
- Set the Type to OpenAPI.
- Set the URL to
http://host.docker.internal:8000/time- If Open WebUI and mcpo are in the same docker network,
http://mcpo:8000/timecan be used, assuming the mcpo image has the namemcpo, like in the docker compose file used above.
- If Open WebUI and mcpo are in the same docker network,
- Set OpenAPI Spec to URL, and openapi.json.
- Set Auth to None.
- Set ID to
time_mcp_mcpo.- This is the string used in the logs to identity the MCP tool call.
- Set Name to
Time MCP via mcpo.- This is the string used in the UI to configure the available tools and MCP servers for the model (see below).
- Set Description to
Get the current time and date
For configuring User Tools Servers, instead:
- Navigate to Settings -> External Tools.
- Click “+“ (Add Connection).
- Set the URL to
http://localhost:8000/timelocalhostbecause the mcpo server is accessible from the browser user session usinglocalhost, or127.0.0.1address.http://host.docker.internal:8000/timeorhttp://mcpo:8000/time
- Set OpenAPI Spec to URL, and openapi.json.
- Set Auth to None.
The time MCP server is now available inside Open WebUI, with two different names: Time MCP via mcpo if configured as Global Tool Server, or mcp-time if configured as User Tool Server.
Create an agent which uses MCP
To be sure the MCP call is considered, and then executed, by the LLM, ensure the model has tools support, and that Function Calling parameter set to Native in the Advanced Params section of the model configuration.
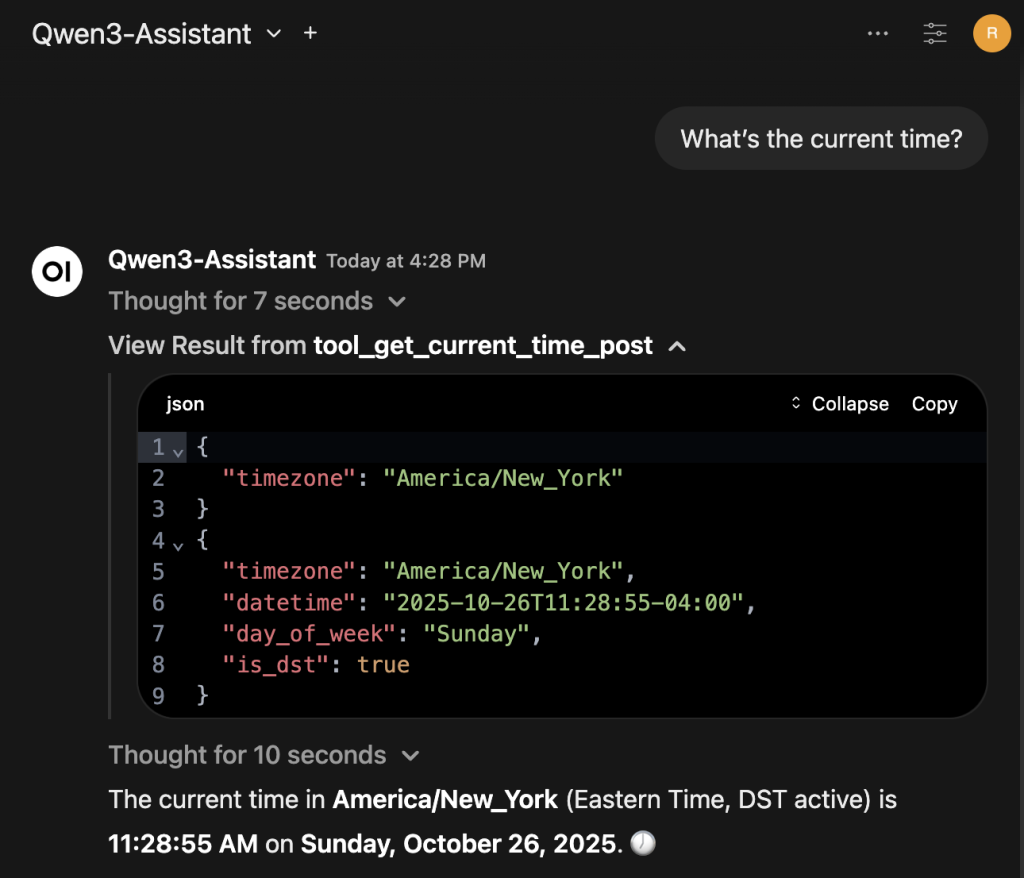
Here an example to create a specialized agent to return the current time, using the MCP server.
- Navigate to Workspace -> Models -> New Model.
- Set Model Name to
Qwen3-Assistant. - Set Base Model to
qwen3:8b.- Or any other model supporting tools calling
- Set Description to
Return the current time. - No need to set any System Prompt.
- Advanced Params -> Show.
- Set Function Calling to Native.
- In the Tools, check Time MCP via mcpo or mcp-time.
Save and start chatting with the agent, for example asking What's the current time?. Here what the result could be, where the result of the time MCP is expanded for additional clarity: